LinkedIn Patches #56 Answer
Stuck on today’s grid? Get the LinkedIn Patches #56 solution and expert logic to maintain your streak instantly. Beyond the answer, explore our tactical hints to refine your spatial reasoning and master the game through daily practice.
LinkedIn Patches #56 has ended!
You're viewing an older LinkedIn Patches answer. Click below to see today's latest Patches #78 answer and challenge!
View Today's Patches AnswerPatches #56 Answer
Patches #56 Expert Logic
🧩 Deep Logic Analysis
Today's grid offered a masterclass in using the board's edges to force a logical chain reaction. The key was not to get distracted by the floating central clues, but to start with the most constrained pieces.
-
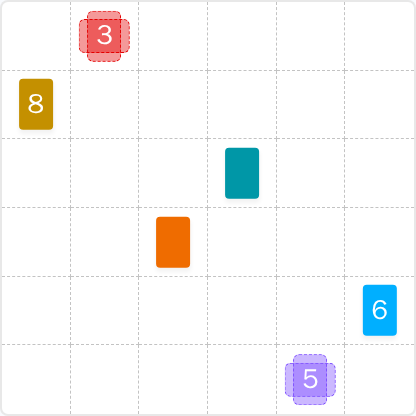
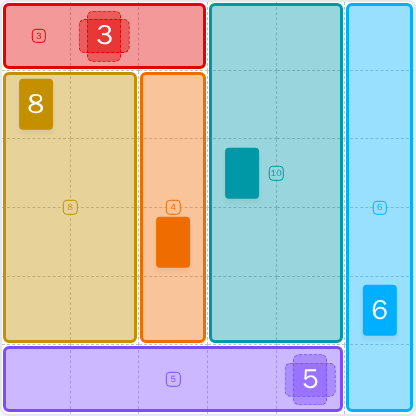
The Starting Point: The Blue 6. The most powerful clue on the board is the Blue 6. Positioned on the far-right edge of a 6-row grid, its options are severely limited. For an area of 6, it could be a 2x3, 3x2, or 1x6 rectangle. A 1x6 strip fits the entire height of the grid perfectly. This is the most probable and cleanest solution, and we pencil it in. This single move defines the entire right-hand boundary.
-
The First Domino: The Purple 5. With the Blue 6 locked in as a 1x6 column, the Purple 5 clue in the bottom row is our next target. As a prime number, it must be a 1x5 or 5x1 strip. If it were a 1x5 horizontal strip, it would leave a single, unfillable 1x1 square in the bottom-left corner. Therefore, it must be a 5x1 strip, filling the remaining 5 squares of the bottom row to the left of the Blue 6.
-
The Chain Reaction: The Gold 8. Now look at the Gold 8 on the left edge. The factors of 8 are (1,8) and (2,4). A 1x8 is impossible on this grid. It must be a 2x4 rectangle. Since the bottom row is already claimed by the Purple 5, the 2x4 rectangle is forced to sit directly on top of it, occupying columns 1-2 and rows 2-5.
-
Solving the Remainder: With these three perimeter pieces placed, the rest of the puzzle falls into place.
- The Red 3, a 1x3 strip, is now forced to occupy the top-left corner above the Gold 8.
- This carves out two remaining empty rectangles. A quick count reveals the vertical orange space is a 1x4 (Area 4) and the final teal space is a 2x5 (Area 10).
🎓 Lessons Learned From Today's Puzzle
- The Perimeter-First Principle: Always start by analyzing clues on the edges and in the corners. They have far fewer possible placements than clues floating in the middle, and solving them first creates a solid framework that constrains the rest of the grid.
- Prime Number Power: Clues with prime numbers (like 3 and 5 today) are your secret weapon. They can only be 1xN strips, drastically reducing ambiguity. With a bit of practice, you will learn to spot these prime clues and use their simple geometry to unlock tougher sections of the puzzle.
💡 Trivia
- Perfect Dissection: This solved Patches grid is a wonderful example of a "simple perfect squared rectangle," where a large rectangle (the grid) is tiled by smaller rectangles, none of which share a common line of any length with another (except at corners). This is a fascinating niche in geometry, and finding such dissections was once a complex mathematical challenge.
❓ FAQ
Why couldn't the Gold 8 be a 4x2 rectangle?
A 4x2 rectangle (4 units high, 2 units wide) is exactly what it was! The key was figuring out where it could go. A 1x8 configuration was impossible because the grid is only 6 rows high. Once the Purple 5 claimed the bottom row, the 4-unit height of the Gold 8 piece was forced to sit neatly in the 5 remaining rows above it, locking it into place.
How did you know the Orange shape had an area of 4?
You don't know the area of the un-numbered shapes at the start; you discover them. The process of elimination is key. By logically placing the numbered patches (Blue 6, Purple 5, Gold 8, and Red 3) based on their constraints, we created a "hole" in the grid. The Orange shape was simply the piece that filled that specific 1x4 hole. Its area is a result of solving the other clues correctly.
Was the Red 3 clue a good starting point?
While it's a prime number, the Red 3 was a less effective starting point than the Blue 6. Because it was near a corner but not locked into it, it had a few potential placements (e.g., a 1x3 strip starting in column 1, 2, or 3). The Blue 6, by contrast, had one overwhelmingly logical placement that defined an entire edge of the puzzle, making it a much more powerful first move.