LinkedIn Patches #58 Answer
Stuck on today’s grid? Get the LinkedIn Patches #58 solution and expert logic to maintain your streak instantly. Beyond the answer, explore our tactical hints to refine your spatial reasoning and master the game through daily practice.
LinkedIn Patches #58 has ended!
You're viewing an older LinkedIn Patches answer. Click below to see today's latest Patches #78 answer and challenge!
View Today's Patches AnswerPatches #58 Answer
Patches #58 Expert Logic
🧩 Deep Logic Analysis
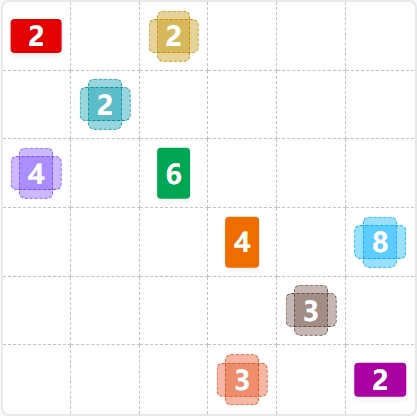
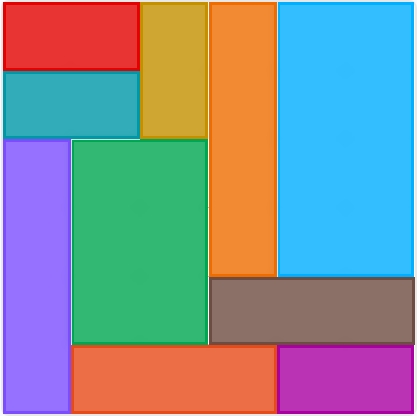
This grid was a fantastic exercise in using corner pieces and large shapes to constrain the board. The solution unfolds in a cascade of logical deductions.
- The Corner Gambit: The most effective starting points are often the corners. We have two prime candidates: the Red 2 in the top-left and the Magenta 2 in the bottom-right. Let's begin with the Magenta 2. As a prime number, it must be a 1x2 or 2x1 rectangle. Placing it as a 2x1 horizontal piece perfectly locks down the bottom-right corner.
- Working the Wall: With the Magenta 2 in place, the Gray 3 above it is constrained. It must be a 1x3 or 3x1 piece. To fit neatly above the Magenta 2 without stranding any cells, it must be a 3x1 horizontal rectangle. This combination immediately solves the bottom two rows of the last three columns.
- The Big Block Constraint: Now, look at the Blue 8. As the largest piece on a 6x6 grid, it has limited options. It cannot be a 1x8 strip, so it must be a 2x4 or 4x2. Since we've already placed the Magenta 2 and Gray 3 in the bottom of its territory (columns 5 and 6), the Blue 8 is forced into a 2x4 vertical orientation, filling the top four rows of those two columns. Just like that, the entire right side of the puzzle is solved.
- The Left-Side Chain Reaction: Let's apply the same logic to the top-left. The Red 2 must be a 2x1 horizontal piece to fit the corner. The Teal 2's clue is positioned directly below it, forcing it into a 2x1 shape as well. This creates a solid 2x2 block. This move is critical because it invalidates the possibility of the Purple 4 being a 2x2 square. With the first column's top two cells occupied, the Purple 4 must be a 1x4 vertical strip to fill the rest of the column.
- Solving the Core: With the entire perimeter now defined, the center falls into place. The remaining space forces the Green 6 into a 2x3 vertical rectangle and the Orange 4 into a 1x4 vertical strip, which resolves the puzzle.
🎓 Lessons Learned From Patches #58
- Prioritize Corner and Edge Pieces: As demonstrated by the Red 2 and Magenta 2, starting in a corner dramatically reduces a shape's possible placements. Resolving the grid's perimeter first creates a container that makes solving the interior much simpler.
- Leverage Large Shapes: The Blue 8 (area of 8 in a 36-cell grid) was a major constraint. Identifying the largest pieces and determining their limited potential placements is a power move. With practice, you'll learn to see how these "bully" pieces dictate the board.
- Question Square Assumptions: It’s tempting to see a '4' and immediately think '2x2 square'. This puzzle brilliantly showed that both the Purple 4 and the Orange 4 were forced into 1x4 strips by their neighbors. Always consider all factor pairs for a number, not just the square root.
💡 Trivia
- The total grid area is 36 (6x6). The number 36 is the smallest number (besides 1) that is both a perfect square (6²) and a triangular number (the sum of the integers from 1 to 8).
- This puzzle contains five "dominoes" (pieces with an area of 2). In geometry, a polyomino made of two connected squares is officially called a domino, named after the game pieces.
❓ FAQ
Why couldn't the Purple 4 on the left be a 2x2 square?
This is a fantastic question that highlights the domino effect in Patches. The Red 2 in the top-left corner had to be a 2x1 piece. The Teal 2 below it was then forced into a 2x1 shape as well. This created a solid block in the top of columns 1 and 2. Since the Purple 4's clue was in the first column, it could not form a 2x2 square without overlapping the already-placed Teal piece. Its only remaining valid shape was a 1x4 vertical strip.
What was the key to placing the Green 6 correctly?
The Green 6 was tricky because it started in the center with few constraints. The breakthrough came not from analyzing the Green 6 itself, but from solving the pieces around it. Once the Purple 4 (on the left) and the Blue 8 (on the right) were locked in as long vertical strips, the width of the central column was defined. This created a 2-column wide space, forcing the Green 6 to be a 2x3 vertical rectangle rather than a 3x2 horizontal one. It’s a great example of solving a piece by solving its neighbors.
Is it always better to start with prime numbers like 2 and 3?
It is an excellent strategy that improves with practice. Prime-numbered shapes (2, 3, 5, 7, etc.) have the fewest possible rectangle configurations—they can only be 1-by-N strips. This severely limits their orientation. When a prime-numbered piece is also near an edge or corner (like the Magenta 2, Red 2, and Gray 3), it becomes one of the most constrained—and therefore most solvable—pieces on the board. Tackling them first often provides the certainty needed to start a logical chain reaction.