LinkedIn Patches #68 Answer
Stuck on today’s grid? Get the LinkedIn Patches #68 solution and expert logic to maintain your streak instantly. Beyond the answer, explore our tactical hints to refine your spatial reasoning and master the game through daily practice.
LinkedIn Patches #68 has ended!
You're viewing an older LinkedIn Patches answer. Click below to see today's latest Patches #78 answer and challenge!
View Today's Patches AnswerPatches #68 Answer
Patches #68 Expert Logic
🧩 Deep Logic Analysis
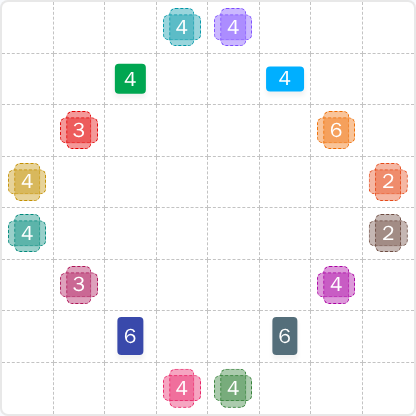
Today's puzzle looked intimidating with its circular clue layout, but the solution hinged on methodically resolving the outer edges first.
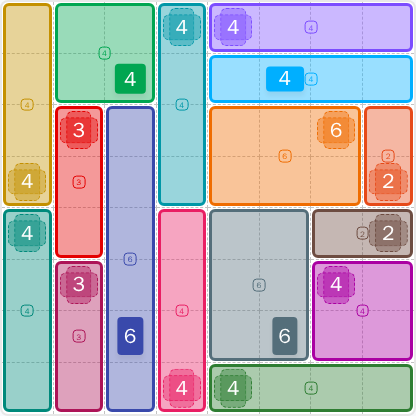
- The Left-Side Anchor: The most definitive starting point was on the far left. The Yellow 4 and Teal 4 clues are both located in Column 1. A shape must contain its clue, and since there's no "Column 0," any shape starting in Column 1 cannot be wider than 1 cell. This forces both the Yellow 4 and Teal 4 to be 1x4 vertical strips. With no other clues in that column, they stack neatly to fill most of it.
- The First Domino: With Column 1 solved, it created a solid wall. The two Red 3 clues in Column 2 were now pressed against this wall. As a prime number, '3' can only be a 1x3 strip. Since they couldn't extend left into the solved column, they were both forced to be 1x3 vertical strips within Column 2.
- The Cascade Continues: This chain reaction flowed directly to the Dark Blue 6 in Column 3. Hemmed in by the solved Red shapes in Column 2, its only logical placement was as a tall 1x6 vertical strip. In just three steps, the entire left side of the grid was nearly solved.
- Solving the Corners: The Green 4 (top left) and Magenta 4 (bottom right) were then forced into 2x2 squares. They were placed in areas where a 1x4 strip would either collide with an existing shape or run off the board. This is a common pattern: as the grid fills, the flexible shapes (like 4s and 6s) lose their ambiguity.
- Final Placements: From there, the remaining pieces like the Orange 6 and Gray 6 were placed by filling the largest remaining empty spaces, a straightforward packing exercise once the key structures were in place.
🎓 Lessons Learned From Patches #68
- The "Wall" Strategy: The most critical lesson here is to identify and solve clues on the absolute edges of the grid first. The Yellow and Teal 4s in Column 1 were the key. Once solved, they created a "wall" that simplified the orientation of every adjacent piece, triggering a domino effect.
- Prime Number Certainty: Don't underestimate the power of prime numbers. The Red 3s could only be 1x3 strips. This certainty is a powerful tool. When you see a prime number clue next to a solved area, you can almost always lock in its shape and orientation immediately. Regular practice makes spotting these opportunities second nature.
- Eliminate Possibilities: For clues like the '4's and '6's, actively think about what they can't be. The Magenta 4 couldn't be a 1x4 strip because the surrounding solved shapes left it with a roughly square-shaped hole to fill. By eliminating the impossible, the correct solution reveals itself.
💡 Trivia
- The numbers on the grid (2, 3, 4, 6) are all factors of 12. This set of numbers is foundational in geometry and timekeeping (like a clock face), which is fitting for the puzzle's circular clue layout.
- The number 6 is the smallest "perfect number"—an integer that is the sum of its proper positive divisors (1 + 2 + 3 = 6). This unique mathematical property makes it a favorite in puzzle design.
❓ FAQ
How did you know the Yellow 4 and Teal 4 had to be vertical?
This was the key starting deduction. Both clues are located in the very first column. Any shape must contain its clue cell. For a shape to be wider than one cell (like a 4x1 horizontal strip or a 2x2 square), it would need to occupy space in a column to the left of Column 1. Since that's off the grid, the only possible configuration for both was a 1x4 vertical strip contained entirely within that first column.
Couldn't the Dark Blue 6 have been a 2x3 rectangle?
While a 2x3 is a valid shape for a 6, it wasn't possible in this specific context. By the time we logically placed the vertical strips in columns 1 and 2, a tall, narrow space was created. The Dark Blue 6 clue was perfectly positioned to become a 1x6 vertical strip that filled this void. Attempting a 2x3 shape would have left small, unsolvable 1-cell gaps and failed to fit in the constrained area. Consistent practice helps build the intuition to see these spatial impossibilities.
Why was the Magenta 4 in the bottom-right forced to be a 2x2 square?
The fate of the Magenta 4 was sealed by the pieces around it. After the right-edge Pink 2 and Brown 2 were placed horizontally and the bottom-edge Dark Green 4 was resolved, the available space for the Magenta 4 was a compact, nearly square area. A 1x4 strip simply wouldn't fit in any orientation without hitting another piece. The only valid '4' shape that could fit in the remaining hole was the 2x2 square.