LinkedIn Patches #69 Answer
Stuck on today’s grid? Get the LinkedIn Patches #69 solution and expert logic to maintain your streak instantly. Beyond the answer, explore our tactical hints to refine your spatial reasoning and master the game through daily practice.
LinkedIn Patches #69 has ended!
You're viewing an older LinkedIn Patches answer. Click below to see today's latest Patches #78 answer and challenge!
View Today's Patches AnswerPatches #69 Answer
Patches #69 Expert Logic
🧩 Deep Logic Analysis
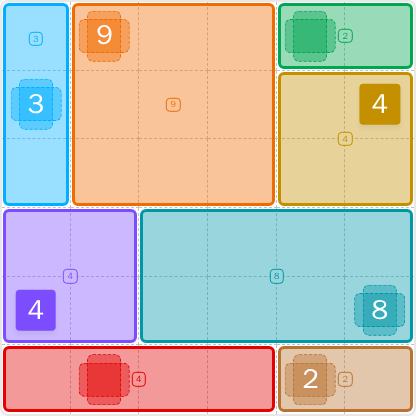
The key to unlocking Patches #69 was identifying the single most constrained piece on the board: the Orange 9. From there, a logical chain reaction solves the entire grid.
-
The Cornerstone Square: The Orange 9 is the perfect starting point. On a 6x6 grid, a rectangle with an area of 9 has only one possible dimension: 3x3. Any other configuration (1x9 or 9x1) is too large. The hint is located in the cell at column 2, row 1. To contain this hint, the 3x3 square must occupy columns 2-4 and rows 1-3. This single placement is the key that unlocks everything else.
-
Pinning the Neighbor: With the Orange 9 placed, the Blue 3 (hint at C1, R2) is now pinned between the orange block and the left edge of the grid. The only way to form a 3-cell rectangle in this 1-cell-wide gap is a 1x3 vertical strip, filling C1, R1-3.
-
Solving the Top Row: The top of the grid now reveals its structure. We have Blue, Orange, and two empty columns on the right (C5-6). The Green hint (for a shape of area 2) sits at C5, R1. A 2-area shape can only fit here as a 2x1 horizontal rectangle at C5-6, R1.
-
The Gold Lock-in: This leaves a perfect 2x2 hole at C5-6, R2-3. The Gold 4 hint is at C6, R3, which falls right inside this empty block. The Gold 4 must therefore be the 2x2 square that fills this space. The entire top half is now complete.
-
Bottom-Half Cascade: Moving to the bottom, the Purple 4 (hint at C1, R5) cannot be a 1x4 rectangle, as the space below the Blue 3 is only three cells tall. It is forced to expand sideways, becoming a 2x2 square at C1-2, R4-5.
-
The Final Chain: This forces the Red 4 (hint at C2, R6) to be a 4x1 strip along the bottom at C1-4, R6. The remaining gaps are now perfectly defined: a 2x1 space for the Light Brown 2 at C5-6, R6, and a large 4x2 space for the Teal 8, which neatly fills the rest of the grid.
🎓 Lessons Learned From Patches #69
- Square & Prime Certainty: The Orange 9 was the linchpin because its dimensions (3x3) were certain. Always scan the grid for numbers that have very few factors, like squares (4, 9, 16) or primes (2, 3, 5, 7). They offer the most concrete starting points.
- Edge & Corner Logic: Use the grid boundaries as a weapon. The Blue 3 was solved not just by its own rules, but by being physically constrained by the edge and the adjacent Orange 9. Pieces on the perimeter have far fewer placement options than those in the center.
- Divide and Conquer: Solving the entire top half (rows 1-3) created a clean, straight border. This turned the puzzle into a simpler 6x3 sub-problem. Conscious practice of segmenting the grid after a few key placements can reduce complexity and reveal the next logical steps.
💡 Trivia
- Perfect Dissections: This solved 6x6 grid is an example of a "perfectly dissected rectangle." This is a branch of recreational mathematics that studies tiling a large rectangle with smaller rectangles of varying sizes. The most famous version of this is "squaring the square"—tiling a square with other, smaller squares of all-different sizes, a problem once thought to be impossible!
- The Number 9: The number nine holds a special property in our base-10 system. The "digital root" of any multiple of 9 is always 9. (e.g., for 9x13 = 117, the sum of the digits is 1+1+7=9. For 9x54 = 486, the sum is 4+8+6=18, and 1+8=9). This provides a quick mental check known as "casting out nines."
❓ FAQ
Why couldn't the Orange 9 be placed in the center of the grid?
The puzzle rules state that the final rectangle must contain its corresponding colored hint. The Orange 9's hint was in cell (2,1) - the second column, first row. A 3x3 square placed in the center of the 6x6 grid would not cover that specific cell, forcing its placement against the top edge.
I was stuck on the Purple 4 and Red 4. How were they resolved?
This is a great example of how clues constrain each other. The Purple 4 hint at (1,5) couldn't be a 1x4 rectangle because the space below the Blue 3 was only 3 cells tall. It had to expand sideways, making it a 2x2 square. This placement then created a clear bottom edge (row 6) for the Red 4. Since the Red 4 hint was at (2,6), it had to be a 4x1 horizontal strip to fit the remaining space on that row. One move directly informed the other.
Was the Teal 8 just the leftover piece at the end?
Essentially, yes, and that's a valid and powerful strategy. In many Patches puzzles, after you logically place the most constrained pieces, one or two larger shapes will perfectly fill the remaining complex area. By solving everything around the Teal 8, its 4x2 placement became the only possibility. It's a process of elimination that becomes more intuitive with practice.