LinkedIn Patches #79 Answer
Stuck on today’s grid? Get the LinkedIn Patches #79 solution and expert logic to maintain your streak instantly. Beyond the answer, explore our tactical hints to refine your spatial reasoning and master the game through daily practice.
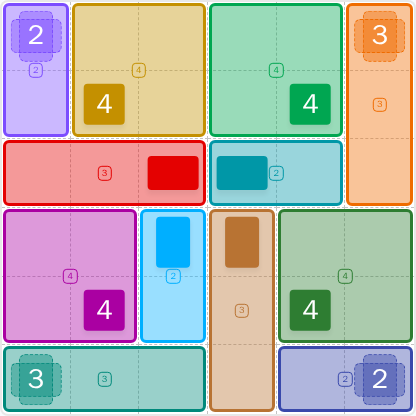
Patches #79 Answer
Patches #79 Expert Logic
🧩 Deep Logic Analysis
Today's grid offered a masterclass in using the corners and edges to create a cascade of forced moves. The key was to establish a solid perimeter before tackling the more ambiguous central column. With a bit of practice, this "outside-in" method becomes second nature.
Here’s the step-by-step deduction:
- The Corner Pin: The puzzle's most definitive starting points were the top two corners. The Purple 2 (top-left) was blocked from expanding right or down by the Gold 4 clue, forcing it into a 2x1 vertical rectangle. Similarly, the Orange 3 (top-right) was pinned by the Green 4, forcing it into a 3x1 vertical rectangle.
- Establishing the Bottom Row: Attention then shifts to the bottom corners. The Teal 3 (bottom-left) couldn't expand upwards without trapping the Magenta 4, so it had to form a 1x3 horizontal rectangle. Likewise, the Blue 2 (bottom-right) was forced into a 1x2 horizontal rectangle by the Dark Green 4 above it. With these moves, the entire top and bottom edges of the grid were solved.
- The Square Squeeze: This perimeter framework created a "squeeze" on the four clues with an area of 4. The Gold 4 and top Green 4 were now bounded on two sides, making 1x4 or 4x1 shapes impossible. They were both forced to become 2x2 squares. The same logic applied to the Magenta 4 and bottom Dark Green 4, which were also squeezed by the newly formed bottom row and their neighbors.
- The Central Collapse: With all four squares in place, the central clues fell like dominoes. The Red clue was now situated in a 3-cell wide horizontal gap between the Gold and Green squares, forcing it to become a 3x1 rectangle. This placement defined the remaining spaces for the central column, locking the Light Blue shape into a 1x2, the Brown into a 1x3, and the Teal into a 2x1, completing the puzzle.
🎓 Lessons Learned From Today's Patches
- The Perimeter-First Principle: When the center looks messy, solve the edges first. By defining the top and bottom rows, you created immovable boundaries that severely restricted the options for all other shapes, making the solution much easier to see.
- Identify Forced Squares: A clue with an area of 4 (or 9, 16, etc.) that is constrained on two adjacent sides will almost always be forced into a square shape (2x2, 3x3, etc.). Spotting this pattern is a massive accelerator, and dedicated practice will help you recognize it instantly.
- Look for Gaps: The Red shape's placement was determined not by its own clue, but by the gap created between the Gold and Green squares. Always pay attention to the negative space; it often gives you the most crucial information.
💡 Trivia
- This grid features four separate 2x2 squares. In geometry, a shape that can be perfectly tiled by smaller squares is called a "squared square." While this entire grid isn't a perfect square itself, it's a beautiful demonstration of how squares can form the structural backbone of a complex tiling puzzle.
- The areas of the shapes are 2, 3, and 4. The numbers 2 and 3 are the only two prime numbers that are also consecutive integers. This unique numerical property adds a hidden layer of mathematical elegance to the puzzle's design.
❓ FAQ
Why couldn't the Gold 4 shape in the top-left be a 1x4 rectangle?
A 1x4 (wide) rectangle would collide with the space required by the adjacent Green 4 clue. A 4x1 (tall) rectangle was even more restrictive, as it would have completely trapped the Red clue in a 1x1 cell, making it impossible for the Red shape to form a rectangle. The 2x2 square was the only configuration that respected the boundaries of its neighbors.
I was stuck on the Red and Teal shapes in the middle. How were their sizes determined?
Their sizes were a direct consequence of other moves. Once the Gold and Green 2x2 squares were placed, they created a fixed horizontal gap of 3x1 cells between them. The Red clue had to expand to fill that entire gap, defining it as a 3x1 rectangle (area 3). This, along with other placements, left a 2x1 space for the Teal shape, defining its area as 2.
Why was solving the bottom row a better strategy than just working from the top down?
Working only from the top down leaves the entire middle and bottom of the grid highly ambiguous. By solving both the top and bottom perimeters first, you establish a rigid "frame." This frame created the necessary pressure on the four "4" clues, forcing them into squares and revealing the final, elegant solution for the central column. It's a powerful strategy that comes with practice, turning a difficult puzzle into a series of logical certainties.