LinkedIn Patches #80 Answer
Stuck on today’s grid? Get the LinkedIn Patches #80 solution and expert logic to maintain your streak instantly. Beyond the answer, explore our tactical hints to refine your spatial reasoning and master the game through daily practice.
Patches #80 Answer
Patches #80 Expert Logic
🧩 Deep Logic Analysis
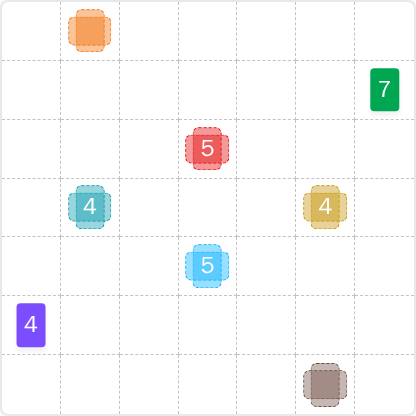
Today's grid was a masterclass in using prime numbers and edge constraints to create a cascade of solutions. The key was identifying the single most constrained piece and building from there.
-
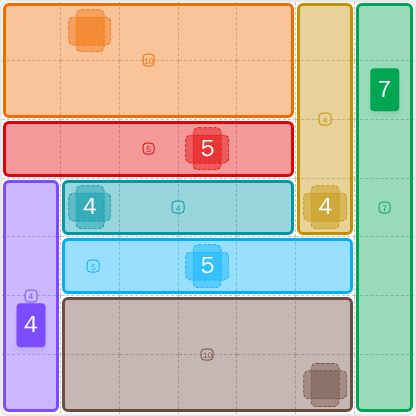
The Cornerstone Piece (Green 7): The most logical starting point is the Green 7. As a prime number, its only possible dimensions are 1x7 or 7x1. Its clue is tucked into the top-right corner. A horizontal 1x7 strip is immediately impossible as it would run off the grid. This forces it to be a 7x1 vertical strip, locking down the entire rightmost column for seven of the eight rows. This single move provides a hard boundary for multiple other shapes.
-
The Right-Side Cascade (Yellow 4): With the Green 7 in place, the Yellow 4 is now heavily restricted. Its clue is in the second-to-last column. It cannot be a 1x4 or a 2x2 shape without colliding with its green neighbor. The only remaining option is a 4x1 vertical strip, which fits perfectly next to the Green 7.
-
The Mid-Grid Squeeze (Red 5 & Teal 4): Now we turn to the middle. The Red 5 (another prime) can only be a 1x5 or 5x1. A 5x1 vertical strip is blocked by the Yellow 4 below it. This forces it into a 1x5 horizontal configuration. This move is crucial because it creates a ceiling for the shapes below it.
-
The Chain Reaction Continues: The placement of the Red 5 immediately boxes in the Teal 4. It can't go up, right, or expand into a 2x2 or 4x1. It is squeezed into a 1x4 horizontal strip. The same logic then applies to the Light Blue 5, which is forced into a 1x5 horizontal shape by the pieces above and to its right.
-
Solving by Elimination (Purple, Brown, Orange): With the majority of the board solved, the remaining pieces fall into place. The Purple 4 in the bottom-left corner has only one place to go: a 4x1 vertical strip in the first column. This final placement reveals the dimensions of the last two shapes. The empty space at the bottom must be the Brown patch (a 2x5 rectangle of area 10), and the remaining space at the top must be the Orange patch (also a 2x5 rectangle of area 10).
🎓 Lessons Learned From Patches #80
-
The Prime Directive: Prime numbers are your best friends in Patches. Clues like 5 and 7 have only two possible rectangular shapes (1xN or Nx1), drastically reducing the initial possibilities. Always scan the grid for primes and see if their position makes one of those two shapes impossible.
-
Perimeter Play is Power: Clues located in corners or along the edges are inherently more constrained than those in the center. The Green 7 in the corner was the perfect example; its position eliminated 75% of its potential growth directions, making it the ideal starting point.
-
Look for the Squeeze: Notice how solving the Red 5 and Yellow 4 created an inescapable trap for the Teal 4. Often, the solution to a difficult piece isn't found by analyzing that piece alone, but by solving the pieces around it to create boundaries that force its shape.
💡 Trivia
-
A Perfectly Powerful Number: The total area of the grid is 64 squares (8x8). The number 64 holds a special distinction in mathematics as it is the smallest number (greater than 1) that is both a perfect square (8²) and a perfect cube (4³).
-
Prime Sums: This puzzle contains three prime-numbered areas: 5, 5, and 7. Interestingly, their sum (5 + 5 + 7 = 17) is also a prime number.
❓ FAQ
Why couldn't the Green 7 be a 1x7 horizontal strip?
The clue for the Green 7 is located in the top-right corner, specifically in the eighth (and final) column of the grid. A horizontal strip requires seven columns of space to expand. Since the clue was already in the last column, a 1x7 shape would extend far off the board, making it physically impossible. This forced it into the only other valid orientation: a 7x1 vertical strip.
How were the areas for the Orange and Brown patches determined?
This was a classic case of solving by elimination. After all the numbered pieces were logically placed, we could calculate their total area: 7 + 5 + 4 + 4 + 5 + 4 = 29 squares. Since the entire 8x8 grid contains 64 squares, 35 squares remained (64 - 29 = 35) for the Orange and Brown shapes combined. The solved pieces formed two distinct, perfectly rectangular voids on the grid: a 2x5 space (10 squares) at the top and another 2x5 space (10 squares) at the bottom. Since the clues for the Orange and Brown patches fell within these voids, their areas had to be 10 each.
What was the most important step after placing the Green 7?
Placing the Yellow 4 was the critical next move. Once the Green 7 created a wall along the entire right edge, the Yellow 4 was the next piece to be constrained by that new boundary. Solving it confirmed the structure of the entire right side of the grid from rows 2 through 5. This, in turn, created the vertical barrier that was essential for solving the Red 5, which kickstarted the chain reaction in the center of the puzzle.