LinkedIn Patches #81 Answer
Stuck on today’s grid? Get the LinkedIn Patches #81 solution and expert logic to maintain your streak instantly. Beyond the answer, explore our tactical hints to refine your spatial reasoning and master the game through daily practice.
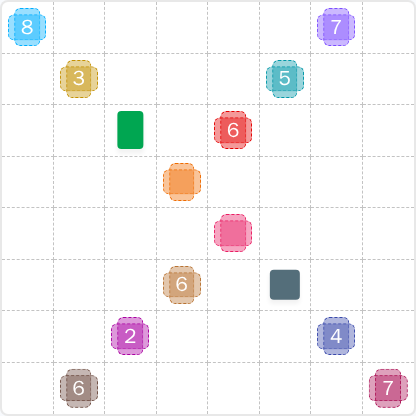
Patches #81 Answer

Patches #81 Expert Logic
🧩 Deep Logic Analysis
This puzzle hinges on methodically solving the perimeter and then working inwards. The corners, especially those with prime numbers, are the undeniable starting points.
-
Corner Lockdown: The most constrained clues are the two 7s in the corners. A prime number like 7 can only form a 1x7 or 7x1 rectangle.
- The Purple 7 in the top-right corner cannot be a 7x1 vertical strip, as it would collide with the bottom of the grid. It must be a 1x7 horizontal strip. This solves the top row.
- Similarly, the Pink 7 in the bottom-right corner cannot be a 1x7 horizontal strip (it would hit the left edge). It must be a 1x7 vertical strip, solving the right-most column.
-
The Domino Effect on the Edges: The placement of these two strips creates a chain reaction.
- With the entire right column now occupied by the Pink 7, the Blue 4 clue next to it is forced. It becomes part of a 2x2 square, also containing the dark grey block, as this is the only way to satisfy a 4-area shape in that confined space.
- The Blue 8 in the top-left corner now has its horizontal expansion blocked by the Purple 7's strip. It can no longer be an 8x1 rectangle. Its only remaining logical shape is a 1x8 vertical strip, locking down the entire left edge.
- This forces the Gold 3 to become a 1x3 strip right beside it.
-
Filling the Gaps: With the outer frame largely defined, the inner pieces fall into place.
- The Brown 6 on the bottom is now boxed in by the Blue 8 and Pink 7 strips. It has only 7 cells of width to work with, forcing it into a 6x1 horizontal shape.
- The Red 6 is now constrained from above by the Purple 7 strip and from the left by the Gold 3 and the Green 2 (which is forced into a 1x2). This leads to its logical 3x2 placement. The rest of the small patches fit into the remaining spaces like a classic jigsaw.
🎓 Lessons Learned From Patches #81
- The Prime Corner Rule: Always start with prime-numbered clues in corners. Their limited configurations (1xN or Nx1) often reveal the solution for an entire row or column right away, providing the structure needed to solve the rest of the grid.
- The "Non-Tiling" Trap: A crucial takeaway here is that the patches do not need to fill the entire grid. Many players get stuck trying to use every square. Recognizing the possibility of empty space is a high-level strategy that unlocks difficult puzzles. This grid leaves 24 cells empty.
- Multi-Clue Deduction: The top lavender patch contained both a '5' and a '7' clue. The rule states the area must match one of the clues. Choosing 1x7 was the correct move because a 1x5 shape would have created an unsolvable 2-cell gap next to it.
💡 Trivia
- Sphenic Sum: The sum of the areas of all the patches in this puzzle (8+3+2+7+2+6+2+6+4+4+6+7) is 57. In number theory, 57 is a "sphenic number" because it is the product of three distinct prime numbers (3 × 19).
- Factorial Voids: The grid is 9x9, for a total of 81 cells. With the patches taking up 57 cells, that leaves 24 empty cells. The number 24 is a factorial, written as 4! (which is 4 × 3 × 2 × 1 = 24).
❓ FAQ
Why couldn't the Blue 8 in the top-left be a 2x4 rectangle?
A 2x4 rectangle from that corner would extend two cells to the right and four cells down. This placement would completely isolate the Gold 3 clue, making it impossible to form a 1x3 or 3x1 rectangle without overlapping. The only way to leave viable space for its neighbors was to place the Blue 8 as a 1x8 strip along the edge.
The top patch has a '5' and a '7' clue, so why is its area 7?
This puzzle demonstrates the "multi-clue" rule: when a patch contains several number clues, its final area must match one of them. You must test which option fits the surrounding geometry. A 1x5 strip would have created a 2-cell gap that couldn't be filled legally, whereas the 1x7 strip created a perfect boundary for the pieces below it. Developing the intuition for this comes with practice.
I solved all the shapes but have lots of white space left over. Did I make a mistake?
Not at all! You solved it perfectly. This is a "non-tiling" puzzle, which is an intentional design to increase the difficulty. The shapes are not meant to cover the entire 9x9 grid. Recognizing that you don't have to use every cell is a key insight and a sign that you're mastering the game's advanced logic.